SPHINX SAFARI
Fun Run on March 21, 2009; John Webster DM
=================
Taizu is sitting in the sand, drawing pictures.
This doesn't seem normal. Tarva uses her Heal skill to
determine that his Wisdom has been depleted down to zero.
Eilyssandra uses her Staff to bring him back. Tarva uses
her Wand to bring those hurt by the Lamia and Swarm -- herself, Eevra,
and Taizu -- back to full HP.
Suddenly Tarva realizes that the pond doesn't look
pure and pristine any more. In fact it looks rank. When she
tells this to everyone else, they also can shrug off the illusion and
see it for the foul mess it really is. Eilyssandra determines
that the water is poisoned and will sap the Wisdom of anyone drinking
it. Contact on the skin takes longer, but is equally sure.
Taizu finds a switch on the back of the GynoSphinx
statue, but prudently (he claims the prudence is entirely in avoiding
giving Tarva a reason to beat him up) does not push it. With
study, he believes that it controls the opening and closing of the
statue's mouth, for allowing swarms to emerge; and also that it is
still in the 'open' position.
Other people, searching all along the sides of the
pool, find a lever right in front of the sphinx (see
drawing, previous diary entry, to determine how cleverly it must have
been hidden, to be between the statue and the pool).
Everyone gets ready to fight the statue, but when the lever is
pulled the pool drains. When the pool is completely drained, the
lever returns to its original position with an audible 'click'.
Eevra and Tarva go down to the triangle, and Eevra rips it off of
the rock it is attached to. Immediately a plume of water spurts
from the statue's mouth and begins to refill the pool. Eevra and
Tarva rapidly get themselves out again. Not waiting for the pool
to completely refill, we start back.
Various people take varying amounts of heat stroke damage
during the trek back. Rowan, as our outdoors guide, finds the
proper direction for us, and we get back to the doors and hallway.
Now that we're (temporarily) safe, Tarva has some
suggestions and ideas she wants to share with the group:
1. Because Tarva is immune to Electricity, any of
the magic users who can, should not hesitate to use spells such as Lightning Bolt on both her and an
in-melee foe;
2. Tarva has some Spell Resistance, so she's
giving advance permission for them to use other, non-Electricity
spells on an area that includes her -- her SR, when it works, will not
protect any of the foes;
3. Tarva has an effective infinite number of
castings of the spells Aid and Blur, and wants to keep the group
buffed up with them, even though that will slow us down some, as it'll
take somewhat over a minute for each session of buffing -- which will
then last about eight minutes;
4. Tarva's Bardic Ability to Fascinate a single creature has a Will
save of 1d20+33; and so long as the creature isn't threatened, it will
last five rounds. If we happen across a potential encounter where
this technique could be employed, she's asking the group to wait and
give her a chance to try this. If it works, then the group will
have half a minute to either accomplish the real task and get back out;
or else to position themselves better for the fight when it does start;
5. After the Leonides encounter, Tarva is
forcing herself to admit that she's not really front-rank material,
despite her self-image. When possible, she's going to stay back
and shoot. When that isn't possible, she's going to use Expertise
and Fighting Defensively to up her AC, and try to be a buffer:
absorbing blows (or, hopefully, misses) while giving the group time to
deal with other foes before coming to her rescue;
6. It seems to Tarva that there may be something
more to the keywords for opening the doors off the Pyramid Room: that
the password for opening each door may also have something to do with
the room that door's corridor leads to. She hasn't, herself, made
very much headway with this idea, and thus hopes that the rest of the
group can brainstorm some better answers than she's come up with:
"knowledge" => hidden, as the roper hiding behind his
illusion;
"foundation" => ¿building on sand?
¿Leonide's plusses from earth contact?
"balance" => plank to ship
"leadership" => wisdom is a key factor
[Rowan points out that Charisma is more of a key factor for
leadership than Wisdom]
7. The murals in the Pyramid Room do not depict the
Queen in any sort of a positive light, thus they could not have been
drawn by any of her supporters, and by extension this entire complex
must be outside of her knowledge. Does that tell us anything
about the puzzles and traps we are encountering?
8. Very minor: in the Pyramid Room, of the
four statues, only the one in the NorthWest corner has its tail curling
around to the right.
We go back to the Pyramid Room, and then down to the room
with the acid lake and the reed boat. Tarva casts Aid and Blur on
everyone [this won't be mentioned hereafter]. Darred and Taizu and
Glendon use the Alter Self wand to turn themselves into sprites: pixies
to be exact. The rest of us cross the plank (5' wide and quite
steady, despite some expectations), and pull it on board with us.
Tarva tries using the oars, and while the acid does not eat them,
nor do they get any grip in the liquid to propel the boat. Taizu
starts reading the scroll, and the boat begins to move forward.
Two gigantic viper-shaped constructs rise out of the
acid: one of stone, the other metallic. Tarva recognizes them as
being Kith Constructs, and vaguely knows that they have lots of
specials, but not any details beyond what we all know about Constructs
in general. None the less she tells everyone this little bit of
knowledge. The constructs bullrush whomever is reading the
scroll, or otherwise near the edge of the boat, or, after a bit, the
boat itself. The first people bullrushed are, fortunately, in
pixie form, and manage to recover and hover instead of falling into the
acid. Most of the group find that their attacks on the Constructs
have no effect. When the boat reaches the midpoint, and the
light-giving globe is immediately overhead, an Elemental Eagle comes
from it and starts several fires over the boat. Eilyssandra uses
Create Water to put these out. One of the Constructs capsizes the
boat, knocking people into the acid or clinging desparately to its
upside-down side. The scroll was also saved. Taizu tells
Tarva (who is holding it) to start reading the scroll again; when she
does, the boat rightens itself and then goes forward again. When
it reaches the far wall, a hidden door opens revealing a niche with a
golden triangle in it. We take that, find that the oars now do
work, and row our way back to the entrance. Wands are used to
restore everyone to full health, especially those who were in the acid.
But with our spells down, we decide to camp out and
wait until tomorrow before doing any further exploring.
The next morning, armed with new spells and four
triangles, we return to the Pyramid Room.
[Editor's insertion for consistency: Over
the millenia since this underground building was built, some settling
of its foundations was nearly inevitable. One result of this is
that the room's central Pyramid, which had started out oriented with
the four walls, and doors, of the room, has by now shifted around to
45° off from that orientation. But, 45° in which
direction?]
Rowan thinks that the four lines on the black
obelisk in the Roper room provide a clue to answer that question --
each line relates to one of the four passwords, and the verse as a
whole thus gives the orientation in which the triangles should be
inserted into the pyramid.
Eilyssandra notices that three of our trianges have an
eye in the center, but the fourth, the one from the Roper room, has it
in one corner instead. She hopes that this doesn't mean we'll
have to go back to that room and hunt for another triangle.
We notice that each triangle has a name on its backside.
Using Rowan's insight, we put the triangles in as follows:
Anshek, from the NW, "balance" room into the North side of the pyramid;
Kheteru, from the SW, "foundation" room into the West side of the
pyamid;
Neteria, from the SE, "leadership" room into the South side of the
pyramid;
All three of these give a satisfying sound when they are inserted, and
won't come back out again. However, the fourth triangle, with its
eye in a corner, does not do this.
So off we tramp down to the Obilisk room again.
Tarva suggests that only two of us go into the room: that Taizu
stands on Tarva's shoulders to reach the upper sides of the Black
Obilisk. After verifying that there are three more triangles, on
the other three sides of the Obilisk, he pulls out the one on the side
nearest to the door. Wham as the ceiling comes down again.
Tarva is able to jump to safety, but poor Taizu (sorry) is caught and
smashed to the floor again. While Rowan helps Taizu crawl out
from under, Tarva walks across the top of the ceiling slab, and with
the triangles now within easy reach pulls both of the others off,
bringing them - one at a time - back to the hallway.
The four triangles from this room also have names
on their backsides, as follows:
Hrakesh, eye in the bottom left corner
Hrikesh, eye in the top corner
Hrokesh, eye in the bottom right corner
Hrukesh, eye in center
We heal Taizu back up to full again, and go back to
the Pyramid Room. Everyone positions themselves, and Eilyssandra
drops the last triangle, Hurkesh, into place. Immediately the
square around the pyramid starts to slowly sink into the ground.
Everyone near the pyramid jumps back and off, and we watch it
sink. Tarva drops her light stone onto the pyramid's "floor", so
we can see that it is going down a shaft, even after it is out of range
of the lights in the Pyramid Room. Somewhere between 240' and
300' down, it comes to a halt.
When nothing else happens for a while, Taizu turns
himself into a Pixie again and flies down. The triangles can now
be removed, but removing them does nothing. Upon putting them
back, however, they lock in place again, and the pyramid rises back to
our level. So we all get on, apply the same technique, and are
lowered gently down to this next chamber:
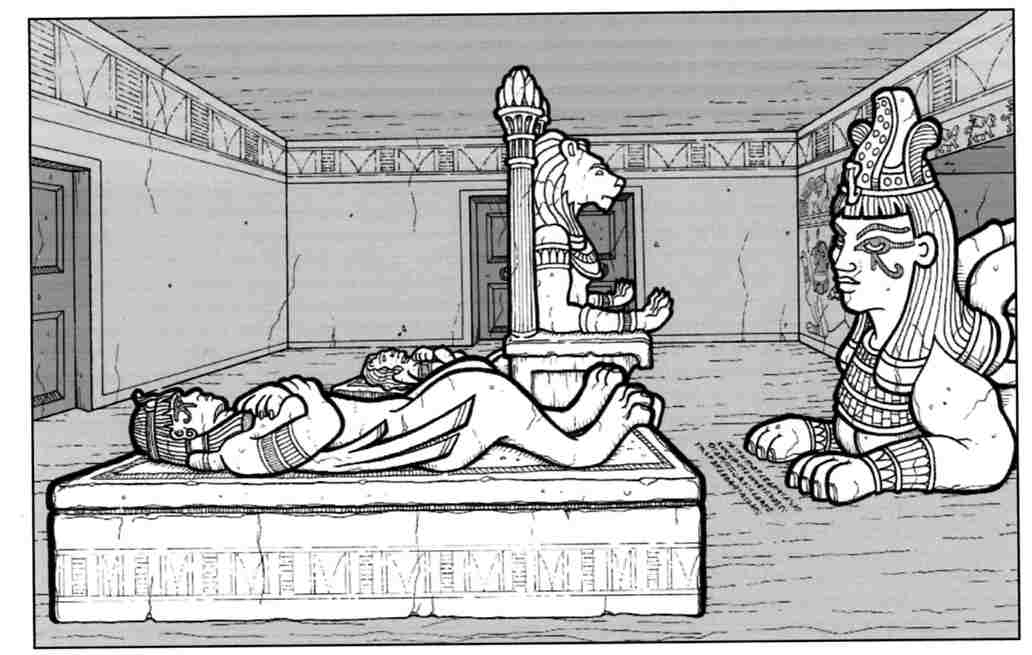
The North and East walls (to left and back in the
drawing) have doors; the South and West walls have murals, two each.
In order, they depict:
1. With the assistance of Khubsheth and the
Golden GynoSphinx, Queen Ankharat is defeated, but not destroyed.
2. The construction of this tomb which is
also Ankharat's prison; Khubsheth sealing the entire structure
with his own blood; as an inset, the Golden GynoSphinx has also been
enprisoned in this tomb.
3. Several humanoids -- clearly NOT sphinxes, but
only vaguely two-legged and with nearly featureless depictions --
investigating the tomb.
4. What seems to be the same group of
humanoids, but even more vaguely depicted, locked in combat with a
shadowy adversary.
There are two sarcophagi with figures of sphinxes lying
on their backs, arms (forelegs) crossed over their chests. There
is a throne with a lion-headed statue, its forearms resting on the arms
of the throne, palms up and open. And a statue of a large
GynoSphinx with a crown, carved seemingly out of what would otherwise
be an alcove along the South wall. In front of the (or so we
guess) representation of Queen Ankharat, just in front of her forepaws,
there is an inscription carved into the floor. Translated, it
reads:

Well, there are two items to put into two places, just as
on the upper floor there were four items to put into four places.
And in parallel to the Pyramid Room, which had four doors leading
to its four items; this room has two doors. We pick the leftmost,
the door in the North wall, and go forward.
Sixty feet away, down a corridor, are another set of
double doors. There is writing on them. Suspiciously, Tarva
casts Read Magic so she can detect Glyphs or Symbols before they can
affect anyone. However, the distance is too great for her to
tell, one way or another. The group advances down the corridor.
Halfway there this voice booms out:
>>>>> Does anyone remember what it said better
than I did? <<<<<
>>>>> Because there are some important pieces I
didn't capture. <<<<<
"Iti-a?un lies beyond
"Wreathed in flames
"Pay heed to the ?inscription?
"...."
>>>>> As you can see, most importantly I
didn't catch which treasure this one is <<<<<
>>>>> Thus which hand it is supposed to be placed
in <<<<<
Closer, Tarva is reassured to find that there are no
Glyphs or Symbols included in the door's inscription, just ordinary
hieroglyphs relating something in the Sphinx language. Tarva
tries her best to read it, but only gets a very poor approximation:
€ € € S S I
H T A € € €
€ I R E € €
E K A L E € €
€ € € D A
E L R € € €
€ E H T
Tarva relates this to the group, and together -- but
mostly Rowan and Eilyssandra -- work past Tarva's poor language skills
as best as they can, with the first breakthrough being that it is
written right-to-left:
T h e R I g h t p A T H
I S S a f e
T H E o t h e R L E A D s t o
t h E L A K E
There is some quick debate as to whether "right"
means "east while facing north", or "correct". Or perhaps both at
once.
We open the doors and see:
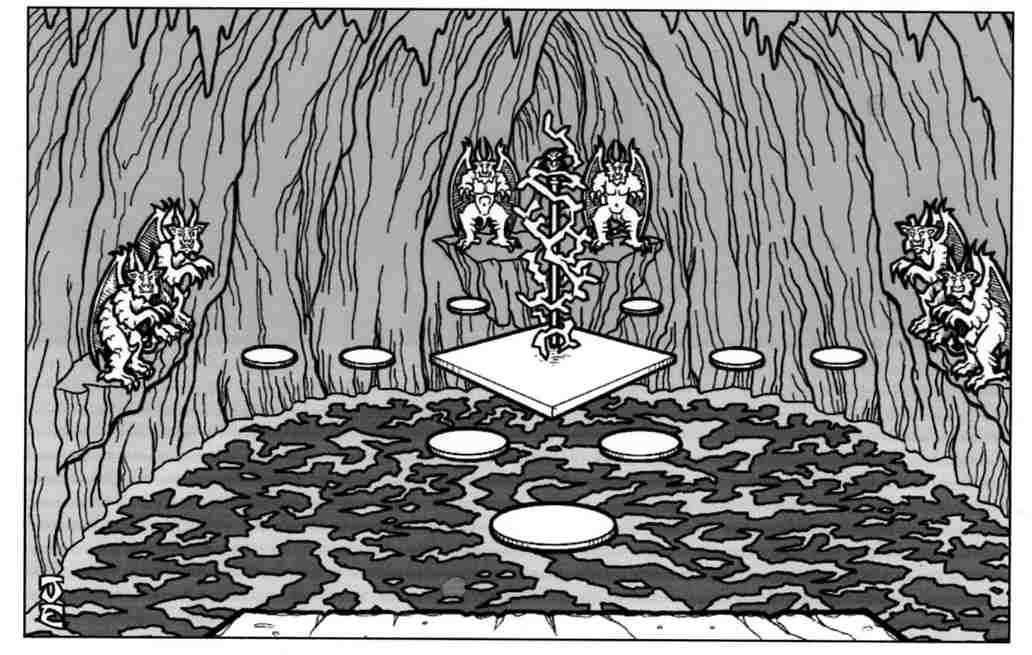
[Editor's Note: Despite what the drawing shows, there are
actually three gargoyleish looking figures on each of the three ledges.]
We glance in, decide that we need to do some
planning, step back outside and close the door. The plan is:
Tarva is taking off everything except armor and HR; Eevra is tying a
100' rope to her, and belaying it to himself (so if he has to drop it
and fight, it won't just run off the ledge); missile users will come
onto the platform to provide covering shots if necessary; Tarva will
jump to each disk and wait, to give time for Eevra to provide more
slack (the slack _should_ always keep a falling Tarva from reaching the
lava, 50' down, although she'll certainly be swung into the cavern wall
fairly painfully).
Everything goes as planned . . . for about six seconds.
Then all the - what someone identifies as Half-Fiend Large
Gargoyles: with some DR and some SR, plus some spell-like abilities -
on the two nearest ledges chant something in unison, and there is
darkness from the left side of the cave to the right, hiding the
central platform and the six disks nearest to it in an area roughly 40'
top to bottom (and, presumably, also front to back). A sudden
gust of wind, perhaps 50mph threatens to blow Tarva off the disk, but
she keeps her balance, asks for more slack, then jumps to where she
thinks the next (going to the right) disk should be. She lands on
it, but then nearly skids off because it has been treated to be very
slick. The Gargoyles -- the ones we can see, anyway -- fly up
into the air and all cast Unholy Blight on the people at the doorway,
then foolishly try to take on group members in fly-by melee attacks.
Tarva feels something touch her, and she's thereafter given to
random uncontrollable shaking. She yells out for the mages to
blast her with Lightning Bolts, hoping that they'll hit the whatever
also. After one Gargoyle suicides while attacking Eevra, and a
second is turned into gravel, the rest grow more cautious and have to
be taken out with missile weapons or magic, which Rowan, Glendon, and
Darred are happy to provide. Tarva -- somehow able to see out
from the darkness, jumps back to the first disk and then to the ledge,
as the big bad in the darkness casts another Unholy Blight on everyone
(except Shay). Rowan hears the big bad bump into the underside of
one of the disks, and that gives her Seeker arrows a good enough target
to find it and kill it.
Eleven minutes later the darkness goes away.
We've spent the waiting time getting everyone healed back up
again, plus Eilyssandra has cast Cure Disease on Tarva to drive away
the shakes.
So at the stopping point, everyone is in full health; and
all we have to worry about - we think - are whatever traps have been
set in this cavern.